 Save
Save There's something about Ho Ho cakes that stops time in the kitchen. My mom would make these for birthdays, and I'd watch her carefully layer the yellow sponge with that impossibly fluffy cream filling, then crown it all with a glossy chocolate glaze that seemed to shimmer under the kitchen light. Years later, I realized this wasn't just nostalgia—it was the perfect marriage of tenderness and indulgence, simplicity and showmanship. This recipe captures that exact magic, and now when I make it, I understand why she treated it like a small ceremony.
I remember bringing this to a potluck and watching my neighbor cut a slice—she paused, fork in mid-air, and said, "Wait, you made this?" It wasn't a question so much as a small act of disbelief, and I felt something shift in how I saw myself in the kitchen. That moment taught me that sometimes the most satisfying cooking isn't the complicated stuff; it's nailing the fundamentals so completely that people assume you must have cheated somehow.
Ingredients
- All-purpose flour: The foundation of your tender crumb; sift it if you have time, but even just whisking it into the dry ingredients breaks up any clumps that can lead to dense patches.
- Baking powder and baking soda: Together they create a crumb that's sturdy enough to hold filling but light enough to melt on your tongue—one without the other and you lose that balance.
- Unsalted butter (for cake): Room temperature is non-negotiable here; cold butter won't cream properly and you'll end up with a denser, tighter crumb.
- Granulated sugar: This isn't just sweetness; it aerates the batter as you cream it with butter, creating those tiny air pockets that make the cake tender.
- Eggs: Add them one at a time so each one fully incorporates; this sounds fussy but it makes a tangible difference in texture.
- Vanilla extract: Use the real thing if you can; the difference between real and imitation is subtle but it rounds out the flavor in a way synthetic vanilla can't quite manage.
- Whole milk: The fat content matters more than you'd think—it enriches the crumb without making it heavy.
- Unsalted butter (for filling): A second round of softened butter creates that silky base the whipped cream folds into.
- Powdered sugar: It dissolves completely into the butter, avoiding any grittiness, and it's lighter than granulated when whipped with cream.
- Heavy cream (for filling): Cold heavy cream whips to peaks with a subtle sweetness that complements the rich cake without overwhelming it.
- Semi-sweet chocolate chips: Dark would be too bitter here; semi-sweet ganache glazes smoothly and sets with just enough snap to contrast the soft cake beneath.
- Heavy cream (for ganache): The heat-to-chocolate ratio determines whether your ganache sets glossy or dull; this amount gives you that professional shine.
Tired of Takeout? 🥡
Get 10 meals you can make faster than delivery arrives. Seriously.
One email. No spam. Unsubscribe anytime.
Instructions
- Prepare Your Stage:
- Preheat the oven to 350°F and grease a 9x13-inch pan with parchment paper fitted snugly inside; the parchment is your safety net for getting the cake out cleanly. Have all your ingredients at the ready so mixing becomes one smooth motion rather than a scattered hunt.
- Dry Ingredients in Harmony:
- Whisk flour, baking powder, baking soda, and salt together in a bowl; this distributes the leavening evenly so you won't get surprise domes or sinkholes in your cake. The whisking also lightens the flour, aerating it slightly.
- Cream Butter and Sugar:
- In a large bowl, beat softened butter and sugar for 2–3 minutes until it's pale and fluffy, almost like mousse; this creaming process is where the cake gets its tender structure. You should be able to draw a line through it with your finger and have it hold.
- Introduce the Eggs:
- Add eggs one at a time, beating after each addition so they fully incorporate before the next one arrives; rushing this step can make the batter break or separate. Vanilla goes in after the last egg.
- The Alternating Dance:
- Alternate adding the dry mixture and milk, starting and ending with flour; this gentle alternating prevents overmixing, which toughens the crumb. Mix just until you don't see streaks of dry ingredient—stop before your instinct tells you to.
- Into the Pan:
- Pour batter into the prepared pan and smooth the top gently with a spatula; don't press down or you'll compress the air you spent time building in. The batter should level itself mostly on its own.
- The Bake:
- Bake 25–30 minutes until a toothpick inserted in the center comes out clean; start checking at 23 minutes if your oven runs hot. You want just-done, not overbaked—the cake will firm as it cools.
- Cool With Patience:
- Let the cake cool completely in the pan on a wire rack; rushing this by running it under cold water or placing it in the fridge will cause uneven setting and potential cracking. A fully cool cake is easier to slice and handle.
- Make the Cream Filling:
- Beat softened butter and powdered sugar until completely smooth, then in a separate bowl, whip cold heavy cream with vanilla and salt to stiff peaks. Gently fold the whipped cream into the butter mixture in two or three folds until no streaks remain—overfolding deflates the air you just built.
- The Careful Slice:
- Once cool, use a serrated knife to carefully slice the cake horizontally into two even layers; a gentle sawing motion (not downward pressure) is key to avoiding crumbles. Some bakers place toothpicks around the cake as guides for an even cut.
- Fill With Intention:
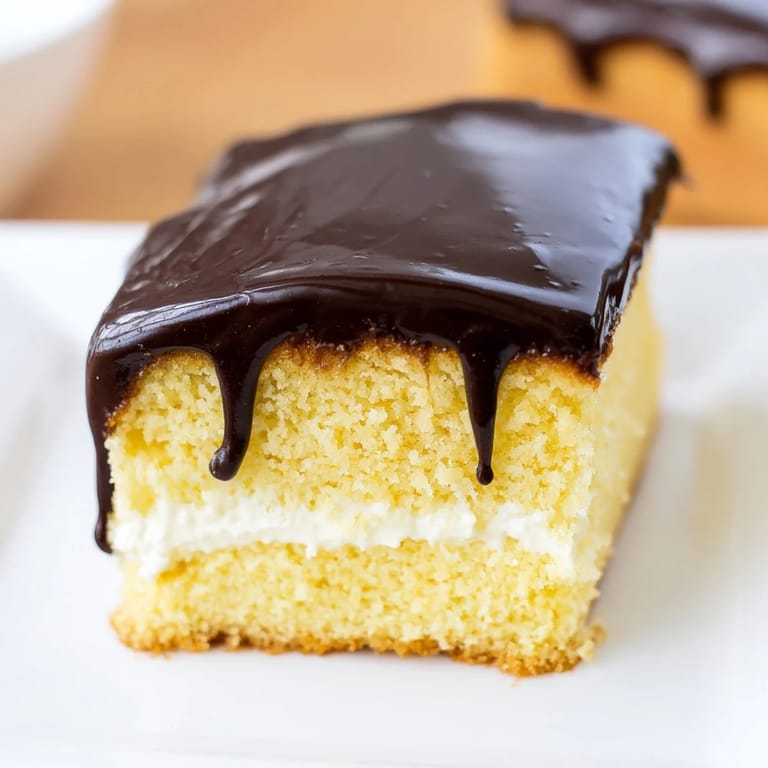
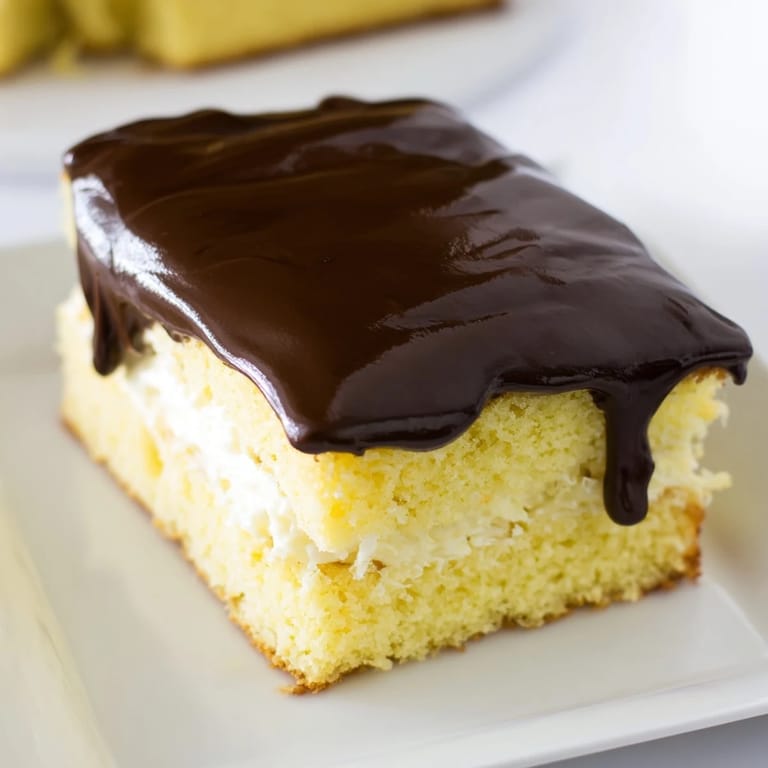
- Spread cream filling generously and evenly over the bottom layer, leaving a small border so it doesn't squeeze out when you place the top back on. Gently set the top layer in place and press very lightly.
- Ganache Magic:
- Heat heavy cream and butter together until steaming and just beginning to bubble at the edges, then pour over chocolate chips in a bowl and let sit for 2 minutes undisturbed. Stir gently until the chocolate melts completely and the mixture becomes glossy and smooth.
- The Final Glaze:
- Pour ganache over the cake and spread evenly with a spatula, letting some drip naturally down the sides for an elegant finish. Let it set in the refrigerator for at least 30 minutes before slicing so it firms up enough to give you clean edges.
 Save
Save The first time I served a Ho Ho cake I'd made myself, my father had a slice and went quiet for a moment—not the polite quiet of being nice, but the quiet of actual surprise. He said, "This tastes like memory," and I understood then that food isn't just flavor; it's permission to feel something again.
Why This Cake Works
The genius of a Ho Ho cake lies in its restraint. Each component—the cake, the filling, the ganache—is simple on its own, but together they create something with real presence. The mild vanilla flavor of the cake doesn't fight the sweetness of the filling or the richness of the chocolate; instead, each layer lets the others shine. This is a dessert that proves you don't need complicated techniques or unusual ingredients to create something memorable.
Storage and Make-Ahead Strategy
This cake actually improves slightly if you make it a day ahead, as the flavors settle and the cake absorbs a hint of moisture from the filling, becoming even more tender. Store it covered in the refrigerator for up to 3 days, and it will slice beautifully straight from cold without the ganache becoming too soft. If you're planning ahead, you can bake the cake layers days in advance and freeze them wrapped tightly; thaw at room temperature before filling and glazing.
Variations and Flavor Companions
While the classic version is perfection, small variations can shift the mood. A tablespoon of coffee extract in the ganache deepens the chocolate without making it taste like coffee, creating an almost mocha undertone that some people prefer. The filling can lean toward marshmallow fluff instead of whipped cream if you want something lighter and more nostalgic, though it will be less creamy and more cloud-like. This cake pairs beautifully with coffee, cold milk, or even a glass of cold tea on a warm afternoon.
- Try a pinch of cinnamon in the cake batter for subtle warmth without disrupting the classic profile.
- A light dusting of cocoa powder over the ganache before it sets adds visual interest and a whisper of extra chocolate flavor.
- Serve slices at room temperature for the most tender bite, even though the cake lives in the refrigerator.
 Save
Save Making a Ho Ho cake is an act of gentle confidence—nothing here is difficult, but everything matters. This is the kind of dessert that reminds you why you cook in the first place.
Common Questions
- → What type of flour works best for this cake?
All-purpose flour is recommended for a tender yet sturdy crumb that supports the creamy layers well.
- → How can I achieve a smooth chocolate ganache?
Gently heating cream and butter before pouring over chocolate chips allows even melting; stirring until glossy ensures smoothness.
- → What is the best way to slice the cake into layers?
Use a serrated knife and slice horizontally after the cake has fully cooled to maintain clean and even layers.
- → Can the filling be made lighter?
Yes, substituting whipped cream with marshmallow fluff yields a lighter, sweeter filling texture.
- → How should the assembled cake be stored?
Keep the finished cake covered in the refrigerator for up to three days to maintain freshness.
- → What flavors complement this cake when served?
This yellow cake pairs beautifully with a cup of coffee or a cold glass of milk for a classic experience.