 Save
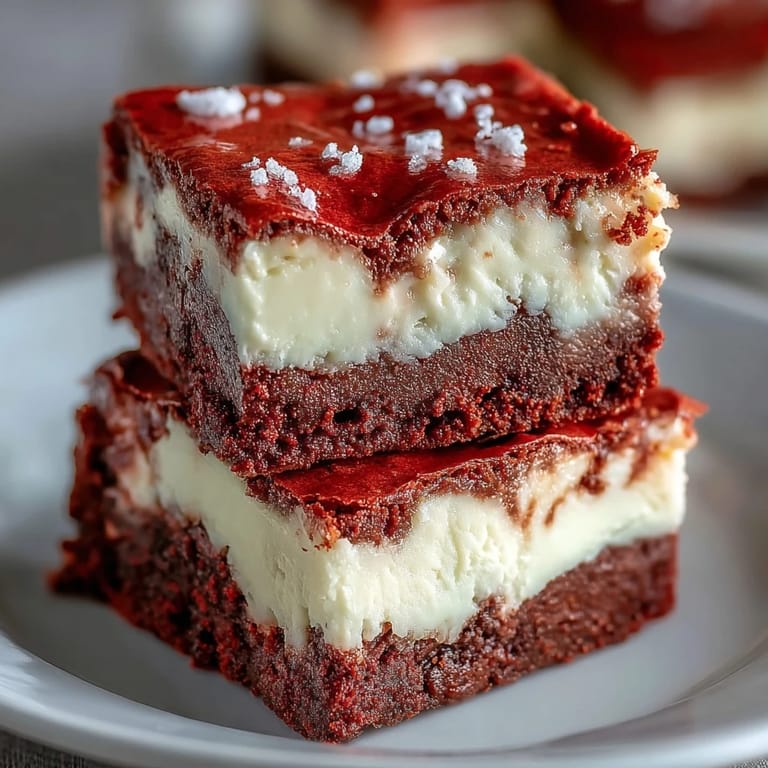
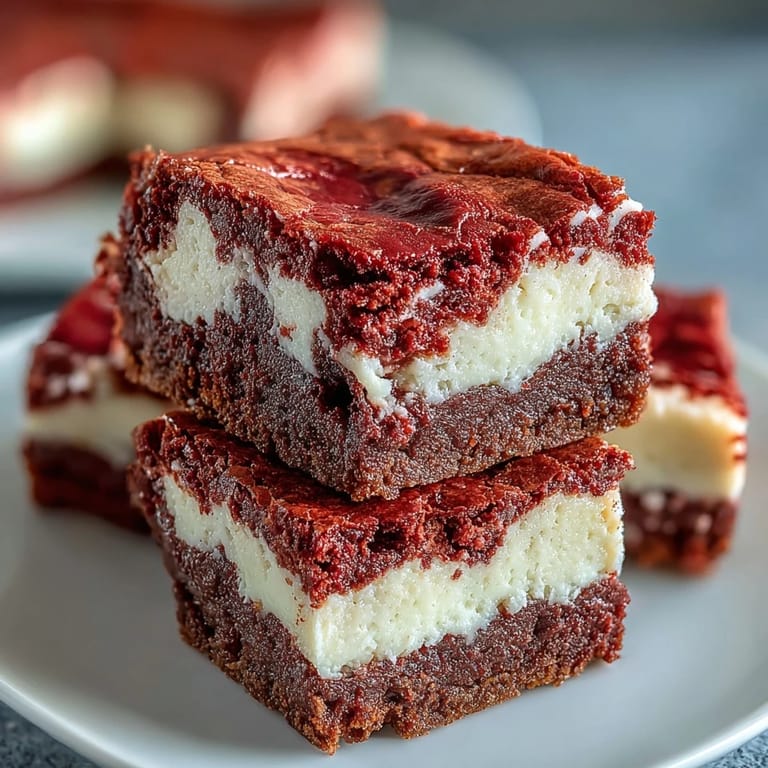
Save My neighbor brought over a pan of these brownies last February, still warm under a tea towel. The kitchen smelled like cocoa and vanilla, and when I bit into one, the tangy cheesecake swirl caught me completely off guard. I asked for the recipe immediately, scribbling notes on the back of an envelope while she laughed at my impatience. That same week, I made them twice.
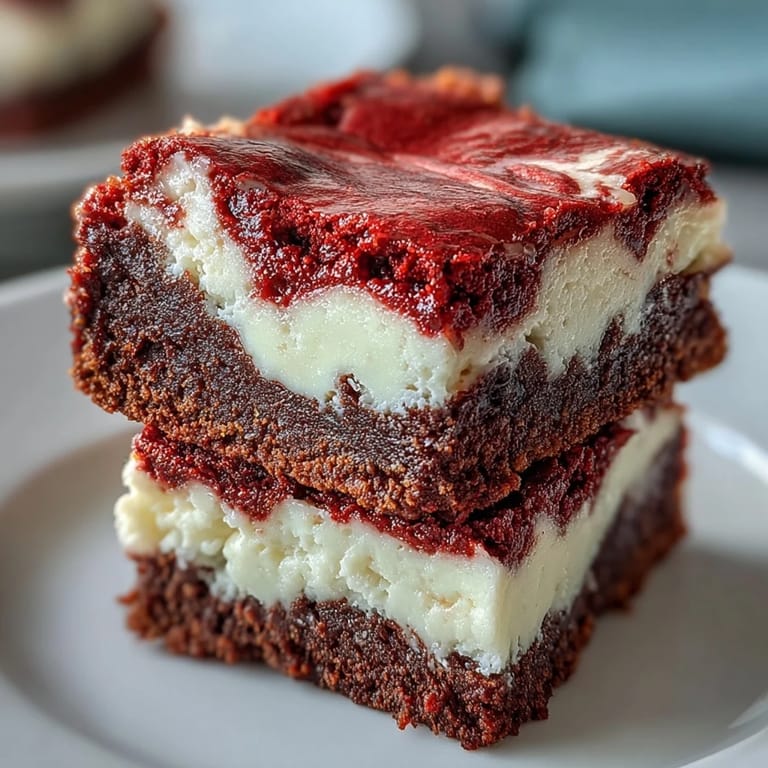
I made these for a birthday party where half the guests were kids and the other half were very opinionated adults. Everyone went quiet after the first bite, which is the highest compliment a dessert can get. One friend asked if I used a special pan, and I had to admit it was just parchment paper and patience. The red velvet batter swirled into cream cheese makes people think you spent hours, but really it takes less than an hour start to finish.
Ingredients
- Unsalted butter: Melted butter blends smoothly into the batter and keeps the brownies moist without adding extra salt.
- Granulated sugar: This sweetens both layers and helps create that shiny, crackly top on the brownie portion.
- Eggs: Room temperature eggs mix more evenly and give the brownies structure without making them cakey.
- Vanilla extract: A little goes into both batters and ties the flavors together with warmth.
- Red food coloring: Gel works better than liquid because it keeps the batter thick and vibrant without adding extra moisture.
- All-purpose flour: Just enough to hold the brownies together while keeping them fudgy, not bready.
- Unsweetened cocoa powder: This gives the red velvet its subtle chocolate backbone without overwhelming the tangy cheesecake.
- Cream cheese: Softened completely so it whips smooth and swirls without streaking.
Tired of Takeout? 🥡
Get 10 meals you can make faster than delivery arrives. Seriously.
One email. No spam. Unsubscribe anytime.
Instructions
- Get the oven ready:
- Preheat to 175°C (350°F) and line your pan with parchment, letting it hang over the sides like little handles. This makes lifting the whole slab out so much easier later.
- Mix the red velvet base:
- Whisk melted butter and sugar until it looks glossy, then beat in eggs, vanilla, and food coloring until the batter turns a deep, dramatic red. Sift in flour, cocoa, and salt, folding gently just until no streaks remain.
- Reserve some batter:
- Scoop out a quarter cup of the red velvet mixture into a small bowl and set it aside. Spread the rest evenly across the bottom of your prepared pan.
- Make the cheesecake layer:
- Beat softened cream cheese until completely smooth, then add sugar, egg, and vanilla, mixing until it looks like thick, pourable cream. Pour this over the red velvet base and spread it gently to the edges.
- Create the swirl:
- Drop spoonfuls of the reserved red velvet batter on top of the cheesecake, then drag a knife or skewer through in gentle loops. Don't overthink it, the swirls always look better than you expect.
- Bake until just set:
- Slide the pan into the oven for 35 minutes, checking that the center barely jiggles and a toothpick comes out with a few moist crumbs clinging to it. Let it cool completely on a rack, then chill in the fridge for at least two hours before slicing into squares.
 Save
Save The first time I served these at a potluck, someone asked if I bought them from a bakery. I took it as the compliment it was and stopped worrying about whether homemade desserts needed to look rustic. These brownies prove that a little swirl and some patience can make something that feels special without any fuss.
Storing and Serving
Keep these in an airtight container in the fridge and they stay perfect for up to five days, though they rarely last that long. The cold makes them extra fudgy, almost like a dense cheesecake bar. Let them sit at room temperature for ten minutes before serving if you want a softer bite, or eat them straight from the fridge if you like that firm, clean slice.
Making Them Your Own
I've stirred white chocolate chips into the brownie batter and loved the little pockets of sweetness they added. A friend of mine sprinkles crushed pecans on top before baking, which gives a nice crunch against all that softness. You can also add a teaspoon of espresso powder to the cocoa for a deeper, richer flavor that makes the red velvet taste even more complex.
What to Watch For
The biggest mistake is cutting them too soon, when they're still warm and soft. The layers need time to firm up or you'll end up with a beautiful mess on your spatula. Use a sharp knife wiped clean between cuts for those neat, bakery-style edges.
- Let the pan cool completely on the counter before moving it to the fridge.
- Use the parchment overhang to lift the whole block out before slicing.
- Wipe your knife with a damp towel after every cut for clean lines.
 Save
Save These brownies have become my go-to whenever I need something that feels impressive but doesn't demand hours in the kitchen. They're rich enough to feel like an event, simple enough to make on a weeknight, and they always disappear faster than I expect.
Common Questions
- → Can I use natural food coloring instead of artificial?
Yes, you can substitute natural red food coloring, though the color may be less vibrant. Beet powder is a popular natural alternative, but you may need to experiment with quantities to achieve the desired hue.
- → Why do my brownies need to be refrigerated before cutting?
Refrigerating for at least 2 hours allows the cheesecake layer to fully set, making it much easier to cut clean, sharp squares. The chilling process also enhances the fudgy texture of the brownie base.
- → Can I make these brownies ahead of time?
Absolutely! These brownies store beautifully in an airtight container in the refrigerator for up to 5 days. They actually taste even better the next day as the flavors meld together.
- → How do I know when the brownies are done baking?
The center should be just set and a toothpick inserted should come out with a few moist crumbs—not wet batter. Overbaking will result in dry brownies, so check at 33 minutes and adjust as needed.
- → What's the best way to create the swirl pattern?
After dolloping the reserved red velvet batter over the cheesecake layer, use a knife or skewer to gently drag through both layers in a figure-eight or zigzag motion. Don't over-swirl or the layers will blend completely.
- → Can I freeze these brownies?
Yes, wrap individual squares tightly in plastic wrap and store in a freezer-safe container for up to 3 months. Thaw in the refrigerator overnight before serving for best texture.